Calculating Surfaces using Arguslab
This exercise is intended primarily to be used in a three-hour drylab session,
with active teaching by demonstrators. Students are expected to have
already learnt basic modelling operations using Arguslab, in the first
drylab session, Drylab: Modelling using Arguslab,
and instructions given there will not be repeated here. As with the
first exercise, the present one should be very useful for private study
as a revision aid, and will particularly help students to understand the
parts of the modelling lecture course dealing with surfaces. Arguslab
is available directly on Campus cluster PCs. It may be run by Start,
Programs,
Departmental
Software, Chemistry, ArgusLab3.
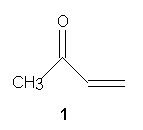 In
this exercise, you will create a model of methyl vinyl ketone 1
and display some of its molecular orbitals as surfaces. You will
map its electrostatic potential onto one of these, and come to some conclusions
about the reactivity of the molecule.
In
this exercise, you will create a model of methyl vinyl ketone 1
and display some of its molecular orbitals as surfaces. You will
map its electrostatic potential onto one of these, and come to some conclusions
about the reactivity of the molecule.
Building the model geometry
-
Start Arguslab
-
Press the New button (top left) to get a new molecule screen
-
The window is automatically set to Add Atoms mode (button with pencil pointing
to a blue ball) and Automatic bond on (button with red bond joining two
blue atoms)
-
Set Automatic bond off, so that you will only make bonds when you shift
click a selection
-
Starting with 4-coordinate C for the methyl group, right click to add this
towards the left of the window
-
Click the 3-coordinate C button, then, at a suitable distance from the
methyl carbon, shift right click to add and join the carbonyl carbon
-
Shift right click to add the alpha vinyl carbon, and again to complete
the vinyl group
-
Change to 1-coordinate O, left click the carbonyl carbon to select it,
then shift right click to add the oxygen
You should have an appropriately shaped skeleton.
-
Click the Select button to exit from Add atoms mode
-
Add hydrogens with the H button. You should get the right number
-
Save the molecule as mevnket
-
Use the pincers button to do a UFF geometry optimisation. If it stops
after 100 iterations without converging, do it again until it does converge
-
Save again
Monitor some bond angles
Here you will measure the three bond angles at the carbonyl carbon, and
set monitors on these, so that you can follow them when you improve the
geometry.
-
So that you can aim with the mouse more easily, switch the display to ball
and stick, using View Display settings... Ball cylinder Normal
-
To measure angles (here as in other modelling programs) you need to select
the three atoms forming the angle, in the order end, middle, end.
In this case the middle atom is always the carbonyl carbon
-
In Arguslab, you do multiple selections by left clicking the first atom,
then holding down the Control key while left clicking the other (two) atoms
in turn
-
Do this for the first of the three angles. The correct skeletal atom
balls only should turn yellow. If everything turns yellow, you have
hit a bug: simply left click the first atom again to start again
-
The bond angle symbol nearly to the right of the top tool bar should now
be ungreyed. Click it to put a green angle monitor on the screen
-
Repeat for the other two angles
-
You may need to rotate the molecule a little, or at least set the display
back to View Display settings... Cylinder Normal, in order to read the
numbers for the angles
-
Write down the three bond angles, noting which is which
-
What do you learn about (a) the equality of the angles; (b) the sum
of the angles? (The sum should be exactly 360º for planarity)
Reoptimise the geometry at the PM3 level
-
Save as mevnketpm3
-
Calculation Optimise Geometry PM3 OK
-
Click the Bunsen button
-
As the optimisation proceeds, you will see the angle monitor values change
-
When the optimisation has succeeded, Save again
-
Write down the new values of the bond angles
-
Why do you think they have changed in this way? (Remember VSEPR,
but consider also steric effects)
Calculate some grid files for the properties you wish to display as surfaces
In this step you will calculate the values of some wavefunctions, and of
the electrostatic potential, at each of a cubic grid of points covering
the space occupied by the molecule. For each function you select,
Arguslab will store the resulting three-dimensional array of values as
a separate file, which will be named automatically
-
Switch off the angle monitors using Monitor Remove All Monitors
-
Set up a single point Calculation Energy
-
Select PM3 and click the Surface Properties button
-
Click Electrostatic Potential
-
In the Click Orbitals to Plot box, click MOs 13, 14 (HOMO), 15 (LUMO),
and 16
-
Do not change the grid spacing suggested by Arguslab
-
OK OK out of the dialog
-
Click the Bunsen button
-
You will see (in the text window) Arguslab calculating two-dimensional
slices of the cubic grid for each MO and for the ESP, but nothing yet appears
in the picture
Calculate and display surfaces for molecular orbitals
A contour is a line in two-dimensional space which connects
points having a particular value, e.g. of a wavefunction. Contour
plots of wavefunctions in a plane through a molecule are used in elementary
teaching of MO theory of symmetric molecules. They may be useful
for bigger molecules if a plane can be found which passes through a region
of interest, e.g. it contains one or two bonds. Generally, however,
it is not possible, and hardly ever easy, to select a plane which contains
all the features of interest of a delocalised MO. We need to view
the whole molecule, in three-dimensional space.
The three-dimensional counterpart of a contour is a surface which
passes through all points in three-dimensional space, which have
a particular value of some property. In the previous section, you
calculated some MOs and the ESP of the molecule at all points of a three-dimensional
grid. For an orbital which you want to display, Arguslab now just
needs to select all the entries in its stored array which have your selected
value of a contour level. Just as it can draw on the screen a perspective
view of a plastic ball to represent an atom, so it can draw a view of a
surface connecting these selected coordinates. As you rotate the
model on the screen to see different atoms, so the surface will also rotate,
so that you can see different features of it.
-
On the main menu bar, click Properties Surfaces
-
On the left of the resulting dialog box, you have a tree of Grid Files
(which you stored in the last section)
-
Click the + against RHF MOs
-
You should see four cube symbols representing the cubic grids you have
calculated.
-
Left drag the cube for MO 16 into the empty Grid box of the central work
area of the dialog box, where you will be able to set up the contour value
and kind of display you want
-
The next typein box below the name of the grid file contains a name for
the surface. It is initially set to 'Simple Surface'. You can
change this to 'MO above LUMO' to remind you of what you will be looking
at
In real research, selecting the contour value usually needs to be done
by trial and error, to explore what information different values will yield.
In a two-dimensional contour plot, several different contour values are
often plotted at once, since any number of non-intersecting lines in the
chosen plane can be seen at the same time. In three dimensions, it
is usually practicable to see only one surface at a time, or in the case
of orbitals with nodes, one positive and one negative surface joining points
with plus or minus a particular numerical value respectively. This
is because surfaces for orbitals (or ESP) are closed surfaces, so that
you cannot see one inside the other.
-
The larger the contour value, the smaller the spatial extent of the surface,
since higher values of the wavefunction are occur nearer to the nuclei.
-
A higher value tends to emphasise the difference in size between different
lobes
-
If you choose too high a value, you will not see the smaller lobes at all
-
If you choose too low a value, useful detail will be lost
-
Set the Contour Value to 0.07
-
So that you can see the model of the molecular geometry through the surface,
set Render Mode to mesh
-
Do this by clicking the Render Mode dropdown arrow, then type m, then click
the word mesh which appears
-
Do not try to alter the word in the box by typing directly, otherwise you
may hit a bug
-
Press Create
-
A new Simple Surface icon will appear in the tree of Currently Defined
Surfaces on the right side of the dialog box
-
To switch the display of the surface on, select the icon for it (an object
with a torch shining on it) and click the Toggle Display button
-
The icon in the Currently Defined Surfaces tree will light up, to show
which one(s) you want switched on
-
OK out of the dialog box
-
If you are still in ball and stick view, change to sticks with View Display
settings... Cylinder Normal
-
Positive and negative surfaces (i.e. wavefunction values of +0.07 and -0.07)
are coloured blue and red respectively
-
Turn the molecule to look in the plane of the conjugated system, so that
your viewpoint is in the p nodal plane
-
How many antibonding nodes are visible?
-
Can you name this orbital type (e.g. s, s*,
p or p*)
-
Why are the lobes on oxygen smaller than those on carbon?
Now you can look at the other three MOs you have calculated, in the same
way, as follows
-
Go back to Properties Surfaces
-
The dialog box will reopen in the state in which you last saw it
-
Select the lit up surface icon, and click the Toggle Display button to
turn it off (before in due course you turn another one on)
-
Repeat the above procedure for creating surfaces, for MOs 15 (LUMO), 14
(HOMO) and 13 (MO below HOMO), in that order.
-
In each case, set the Contour Value to 0.07
-
On viewing each, answer the following questions:
-
MO 15 (LUMO):
-
Why is this orbital more stable than MO 16?
-
How many antibonding nodes are visible?
-
Observe that this MO is both bonding and antibonding at the same time
-
Which atomic contacts is it bonding across, and which is it antibonding
across, and what are the types of these bonds, e.g. s,
p
or d ?
-
Which carbon atom carries the biggest lobes?
-
This will be important later, when we consider reactivity
-
MO 14 (HOMO):
-
As this MO contains electrons in the ground state of the molecule, it will
have a real bonding or antibonding effect
-
Make a list of which atomic contacts this MO is bonding across and which
it is antibonding across, and the types of these bonds or antibonding effects
(s or p)
-
Remember the rule from elementary MO teaching that stable molecules usually
have MOs filled with electrons up to and including the non-bonding valence
orbitals
-
Would you expect this molecule to have any non-bonding valence electrons
(i.e. 'lone pairs')? If so, where should they be?
-
Can you reinterpret this MO as being mainly a lone pair orbital?
-
What does this tell you about the reality of lone pairs, in ordinary MO
theory like this?
-
NBO analysis is able to reassign the
calculated electron density to nearly full lone pair or bonding orbitals,
and nearly empty antibonding orbitals, but MOs as they are usually calculated
are delocalised and are either exactly full (singly or usually doubly occupied)
or exactly empty in a particular state
-
MO 13 (MO below HOMO):
-
What combination of localised orbitals best corresponds to this MO?
Electrostatic Potential
Electrostatic potential is the repulsive or attractive energy felt by a
unit positive charge as a result of the combined effect of nuclei and electrons
in the molecule. It is of interest when considering the attack of
charged or dipolar nucleophiles or electrophiles on the molecule.
In an earlier section you have already calculated the ESP at every point
of the cubic grid covering the molecule. It does not depend on a
knowledge of individual orbitals, but on the distribution of the whole
electron density and of the nuclei. In the absence of electronic
method data, it can be calculated approximately from electronegativities.
-
From Properties Surfaces, generate a simple surface for the Electrostatic
Potential gridfile, using the same settings as for the MOs which you studied
-
This surface is not very helpful: it shows that the space around
the oxygen feels a negative potential, and that around the rest of the
molecule feels a positive potential, which you could have guessed from
elementary ideas of electronegativity
-
Changing the contour level, which you can do within the Properties Surfaces
dialog box by dragging the surface icon back onto the work area in the
middle, altering the level, then pressing Update, does not allow more interesting
variations in the ESP to be identified
-
To attract a negatively charged or strongly dipolar nucleophile, there
needs to be a high positive potential where there is also a dense lobe
of the LUMO
-
A method has to be used which can show the values of the LUMO wavefunction
and the ESP at the same time at the same point
-
A popular method, which we shall use here, is to show the LUMO as a translucent
surface, but colour it according to the value of the ESP at each point,
using a range of colours rather than just two for positive and negative
-
If we were not interested in a covalently bonded transition state, and
hence did not want to know about the LUMO, we could instead map the ESP
onto a surface of total electron density, or, if electronic data were not
available at all (e.g. for a very large molecule), onto a Van der Waals
radii surface
-
Raise the Properties Surfaces dialog box, and toggle off the display of
the ESP surface
-
Click the Mapped tab on the top of the central work area of the dialog
box
-
This is similar to the simple surface work area, but has two boxes to fill
in instead of one
-
Into the Main (Grid 1) box, drag the LUMO (MO 15) Grid File cube icon
-
Into the Mapped (Grid 2) box, drag the ESP Grid File cube
-
Call the surface 'ESP onto LUMO'
-
Set the Contour Value to 0.07 as before
-
For most useful colouring (found by trial and error so as to maximise differences
between sites of attack) set
-
Max Map Value to 0.17
-
Min Map Value to -0.02
-
Num. of Colors to 200
-
Set Render Mode to transparent, so that you have a more continuous surface
than a mesh to display the colour on
-
Click Create
-
A surface icon should appear in the Currently Defined Surfaces tree, under
Mapped Surface
-
Toggle Display of it on, and OK out
-
Look into the plane of the p node as before
-
You should see that only the lobes on the carbonyl carbon are violet, the
highest ESP on the scale (>+0.15), on the outside where they could be attacked
-
The terminal vinyl carbon, which has the biggest lobes, is tinged with
cyan, representing about +0.07
-
Only a very small portion of the LUMO, at this contour level, feels a negative
potential
-
Write down a conclusion about the likely sites of attack of
-
a soft nucleophile, depending on good overlap in a covalent transition
state
-
a hard, dipolar nucleophile, in which the need for overlap is balanced
against good electrostatic attraction