Today's lesson is all about using the Pegasus e-mailer ![]() . It covers the following subjects: how to make Pegasus even easier to use, using it to send a message, using it to send an attached file, finding e-mail addresses. You should note that Pegasus comes in many different versions.
. It covers the following subjects: how to make Pegasus even easier to use, using it to send a message, using it to send an attached file, finding e-mail addresses. You should note that Pegasus comes in many different versions.
The first thing you should do is to save this lesson as a Bookmark. Then you can always go back to it easily.
CONTENTS
Setting up Pegasus so its even easier
Using the mailer to send a message
Using the mailer to send an attached file
Finding e-mail addresses.
To begin with Pegasus gives you a window with (frankly) a rotten toolbar that (usually) looks like this:

It is far better to have a simple vertical button panel like the picture below.  .
.
To get this, follow these steps.
In Pegasus click on Tools Options and choose from the list presented Button Panel. You will then be presented with a simple box which enables you to choose a vertical (or horizontal) button panel. Click your choice, the vertical button panel.
Using the mailer to send a message
This could not really be easier, you simply click on the send mail button.  .
.
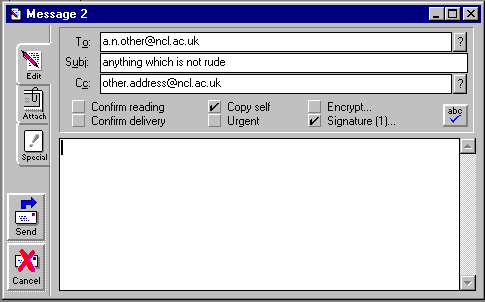
You should then get a box something like this:
 .
.
Type the electronic address in the to: box as described on screen. It is a good idea to click the Copy to self box, which will store your messages in a separate folder. By default, all the messages you receive are stored in your main folder. You can create your own folders by clicking on the folder button. . Do this to open stored mail messages.


There are three ways of finding e-mail addresses. For local addresses, at the University of Newcastle, you can use the Super Client program which is the icon Find Newcastle e-mail on the University PCs in the Information Group. A quicker way is provided by Netscape itself. Click on the Bookmarks menu and you should find Search for a Newcastle e-mail address. The same facility is also directly available from the Newcastle University Home Page.
Searching for e-mail addresses outside Newcastle is not so easy since there is no national e-mail directory. The best way, if your friend is at a Higher Education institution, is to looking at that University or College's Home page. Many institutions provide their own e-mail directories.
A brilliantly helpful tool to do this is this Sensitive Map of all Higher Education Institutions in the UK. Just click on the red stars to go straight to the relevant home page.
Course for next week, searching the web