This tutorial can be done from handouts, but it can also be followed, or repeated, using Netscape. It can be found in the History Department Web Page, as part of the IT for first year historians pages.
If using the Netscape version, the first thing you should do is to save this lesson as a Bookmark. Then you can always go back to it easily.
Introduction: the History Department network
This network has ten workstations. They all run from a fileserver located in this room. At present there is only a limited printing facility. To print out a document, you only need to put your finished work onto a floppy disk and move to the printer station at any UCS cluster.
To login to the network you begin just as you would on a University PC cluster. At the LOGIN prompt type:
You cannot use this network without a login name and password. To get one you have to have self-registered on the University PC clusters.
Why should you learn computing?
The aim of this session
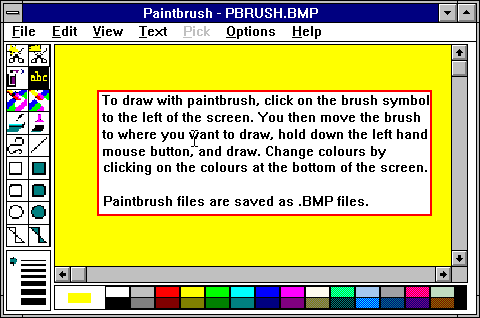
This teaches mouse control and can be fun. Load the Paintbrush
icon in the Accessories group ![]() by double clicking on its icon.
Draw a nice picture. Then save the picture by pulling down
the File menu and selecting Save.
The picture will be saved as a file called a bitmap file, with
an file extension .BMP. You can open it again with paintbrush
or any other graphics package.
by double clicking on its icon.
Draw a nice picture. Then save the picture by pulling down
the File menu and selecting Save.
The picture will be saved as a file called a bitmap file, with
an file extension .BMP. You can open it again with paintbrush
or any other graphics package.
 Paintbrush is easy to use. Like all windows packages it has a
series of pull down menus such as File Edit
View at the top. Click on these and you are presented
with a series of options. Each of the symbols in the boxes to
the left lets you select a function, such as a roller
 , the
aerosol spray
 , the rubber
 , adding text
 , drawing filled or empty
shapes and so on. Colours can be changed by clicking on them at
the bottom.
Spend about ten minutes drawing a picture.
Then close Paintbrush, by clicking twice on the top left hand button, or once and selecting Close
Formatting a floppy disk
All your work should be done on the hard disk drive of your computer. On the networks this will be the F:\ drive. However, you will need to make copies of this work on a floppy disk, lodged in the A:\ drive.
This is easy. You get hold of a floppy disk. You open the File Manager (in the Main or Commonly Used Programs group). Click on the pull down menu Disk and select Format disk. Then follow the simple instructions on disk.
All floppy disks have to be formatted once before they can be used. Formatting eliminates any information they may have contained before.
This will take about ten minutes all told. Now you can move files from your F:\ drive to your disk in the A:\ drive with File Manager.
Use the ALT-TAB key. Use it to jump to the File Manager and to the Program Manager.
In the Program Manager open Microsoft Word by clicking on the word icon which looks like this:

There are lots of good self-taught tutorials provided by the University Computing Service which can take you through all you need to know. This session will just introduce you to a few of the basics.
To begin with, type a paragraph of text. For a subject, try the meaning of life, what I did in the summer holidays, or what I think of induction week so far.
Then select that block of text, by moving the cursor to the front of the text, clicking once and then holding down the left hand button of the mouse and moving it to the end of the paragraph. It should look black. Selecting is a basic windows operation. Practice it.
Once you have selected text you can cut and paste it, alter its
size or font, add a border and so on... You can do this with the
'quick keys', or by clicking on the appropriate cut, copy and paste buttons on the
toolbar  .
.
Try playing around with the text. To alter its size, click on
the arrow pointing down next to the number 12 below the tool bar.
To alter its font, click on the arrow pointing down next
to the font name (currently Times New Roman or perhaps
Arial). To add emphasis click on the bold,
the italic and the underline buttons .
You can also centre it, or right justify it.
Now save your work by clicking on the save button or selecting the File menu and selecting Save.
Now move your new file to your floppy disk in the A:\ drive,
using the File Manager![]() .
.
Remember how to jump between windows? Lastly, try and make time to practice... and do not forget to self-register as soon as possible on the University PC clusters as soon as possible.